Matrix is an open source project and standard for instant-messaging. It’s already being used (in an adapted form, mostly) by government agencies and corporations in some parts of the world. In the past it had been a bit tedious to set up, so over the past two years or so, I’ve payed Element to host a Matrix server for me. However, since I have not been using it much but was also missing some flexibility to play with the server itself, I started looking at self-hosting again.
Luckily, there has been some very active development on automating those deployments on Github: spantaleev/matrix-docker-ansible-deploy. And since the Matrix protocol itself is HTTPS-based, most of the services can actually be exposed through Cloudflare. This adds some useful security and by using Cloudflare Tunnels we can also host this anywhere: there are no dependencies on static IP addresses or poking holes in your firewall.
In this guide I’ll show you how to:
- Connect to your server with SSH through Cloudflare Tunnel
- Configure Ansible and the Matrix Docker playbooks to get your first deployment going
- Exposing the Matrix services through Cloudflare Tunnel
- Setting up proper delegation and discovery with Cloudflare Workers
- Using Cloudflare R2 for media storage
- How to receive Cloudflare webhook notifications in your new Matrix server
Server Setup
As we want to focus on the Matrix + Cloudflare part, I’ll not spend to much time on getting the server set up, but any major distro should work, and easiest is to use one that’s supported on the pkg.cloudflare.com list so you can grab cloudflared from the package repository.
To connect to your server through Cloudflare Tunnel, you’ll basically need to follow this tutorial: Connect to SSH server with cloudflared access. You’ll create a Public Hostname such as this:
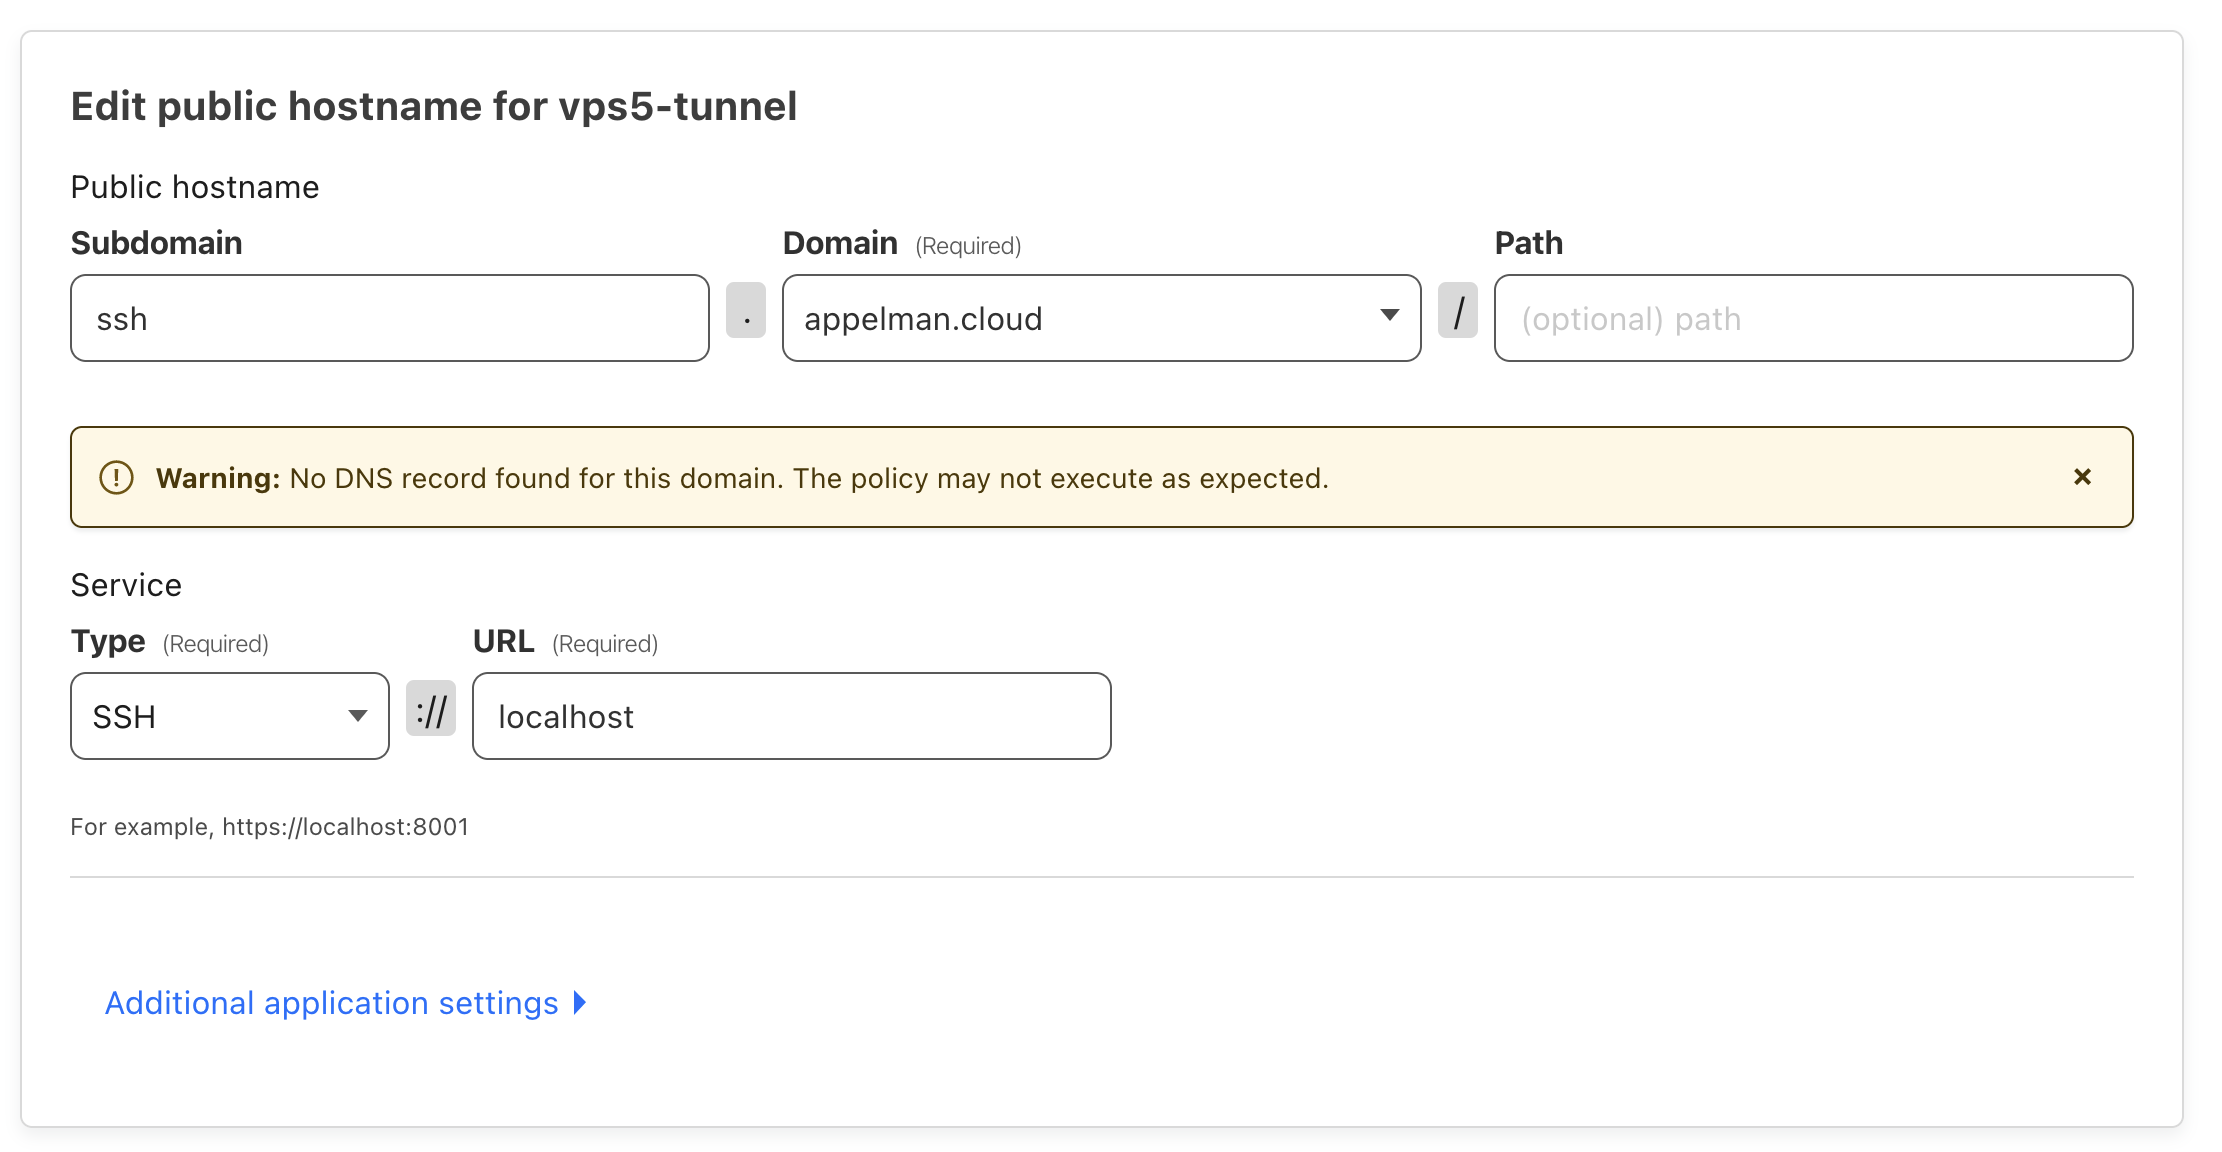
Public Hostname for SSH on your server
I’m also skipping a big part about getting Access Applications set up for this, BTW. So if you haven’t already, please take some time to go through:
- Setting up user authentication, either through a One-time PIN or an Identity Provider (Recommended).
- Protecting hostnames using authentication with Cloudflare Access Applications.
When you feel ready with that setup, you’ll need to install cloudflared on your own computer (from where you normally run SSH) as well (for macOS users: brew install cloudflared). By using the ProxyCommand in .ssh/config, you’ll be able to transparently connect to the server:
Host ssh.example.com
    ProxyCommand /usr/local/bin/cloudflared access ssh --hostname %h
Test whether that works and if you did have any ports open on your firewall for SSH towards your server, feel free to close them. All your SSH traffic will now be going over the Cloudflare Tunnel. Isn’t that a safe feeling!?
Connecting with Ansible
First start by having a read through the matrix-docker-ansible-deploy docs. Specifically:
Because we’ve configured our server to be reachable through Cloudflare Tunnel, we need to make some advanced adjustments to the inventory/hosts file:
[matrix_servers]
matrix.example.com ansible_host=ssh.example.com

[matrix_servers:vars]
ansible_ssh_user=root
ansible_ssh_private_key_file='~/.ssh/id_ed25519'
ansible_ssh_common_args='-o ProxyCommand="/opt/homebrew/bin/cloudflared access ssh --hostname %h" '
This looks pretty similar to the .ssh/config set up, and I also included the SSH key that the connection should use, which I also assume is something you’ve set up for your server.
When this looks good you can test the connection to the server with Ansible by running the following command:
ansible -i inventory/hosts all -m ping -v
Configuring the Playbook
Most of the customization is already done by now. What’s left is putting Cloudflare Tunnel in front of the two main Matrix services, and deploying the full set of services.
Since we’ll use Cloudflare Tunnel as the main point of entry, we’ll follow the matrix-docker-ansible-deploy docs about using your own webserver. If we follow along in that article, you’ll end up with a configuration file looking like this:
# By default, the playbook manages its own Traefik (https://doc.traefik.io/traefik/) reverse-proxy server.
# It will retrieve SSL certificates for you on-demand and forward requests to all other components.
# For alternatives, see `docs/configuring-playbook-own-webserver.md`.
matrix_playbook_reverse_proxy_type: playbook-managed-traefik

# Ensure that public urls use https
matrix_playbook_ssl_enabled: true

# Disable the web-secure (port 443) endpoint, which also disables SSL certificate retrieval
devture_traefik_config_entrypoint_web_secure_enabled: false
devture_traefik_container_web_host_bind_port: "127.0.0.1:81"
devture_traefik_config_entrypoint_web_forwardedHeaders_insecure: true
devture_traefik_additional_entrypoints_auto:
  - name: matrix-federation
    port: 8449
    host_bind_port: "127.0.0.1:8449"
    config: {}

# Disable integrated Coturn server
matrix_coturn_enabled: false
I disabled the TURN service because I have no need for audio/video calls through Matrix. Enabling TURN is possible, but then you’d have to expose your server from outside of Cloudflare, which might be a bit scary.
With all of the base configuration done, have a look at the installation instructions (or blindly run just setup-all 😅).
Cloudflare Tunnel
While that is doing its thing (without any errors 🤞), we can proceed to expose the services through Cloudflare Tunnel. What’s important to note is that a single service on the server has to have a single hostname. This means we cannot expose the Matrix Client service (exposed locally behind port 81) and the Matrix Server service (local port 8449) both behind matrix.example.com. However, we’ll trick the Matrix server into thinking that it is running on the same hostname.
For that we create two Public Hostnames:
matrix.example.compointing to port 81 on the server: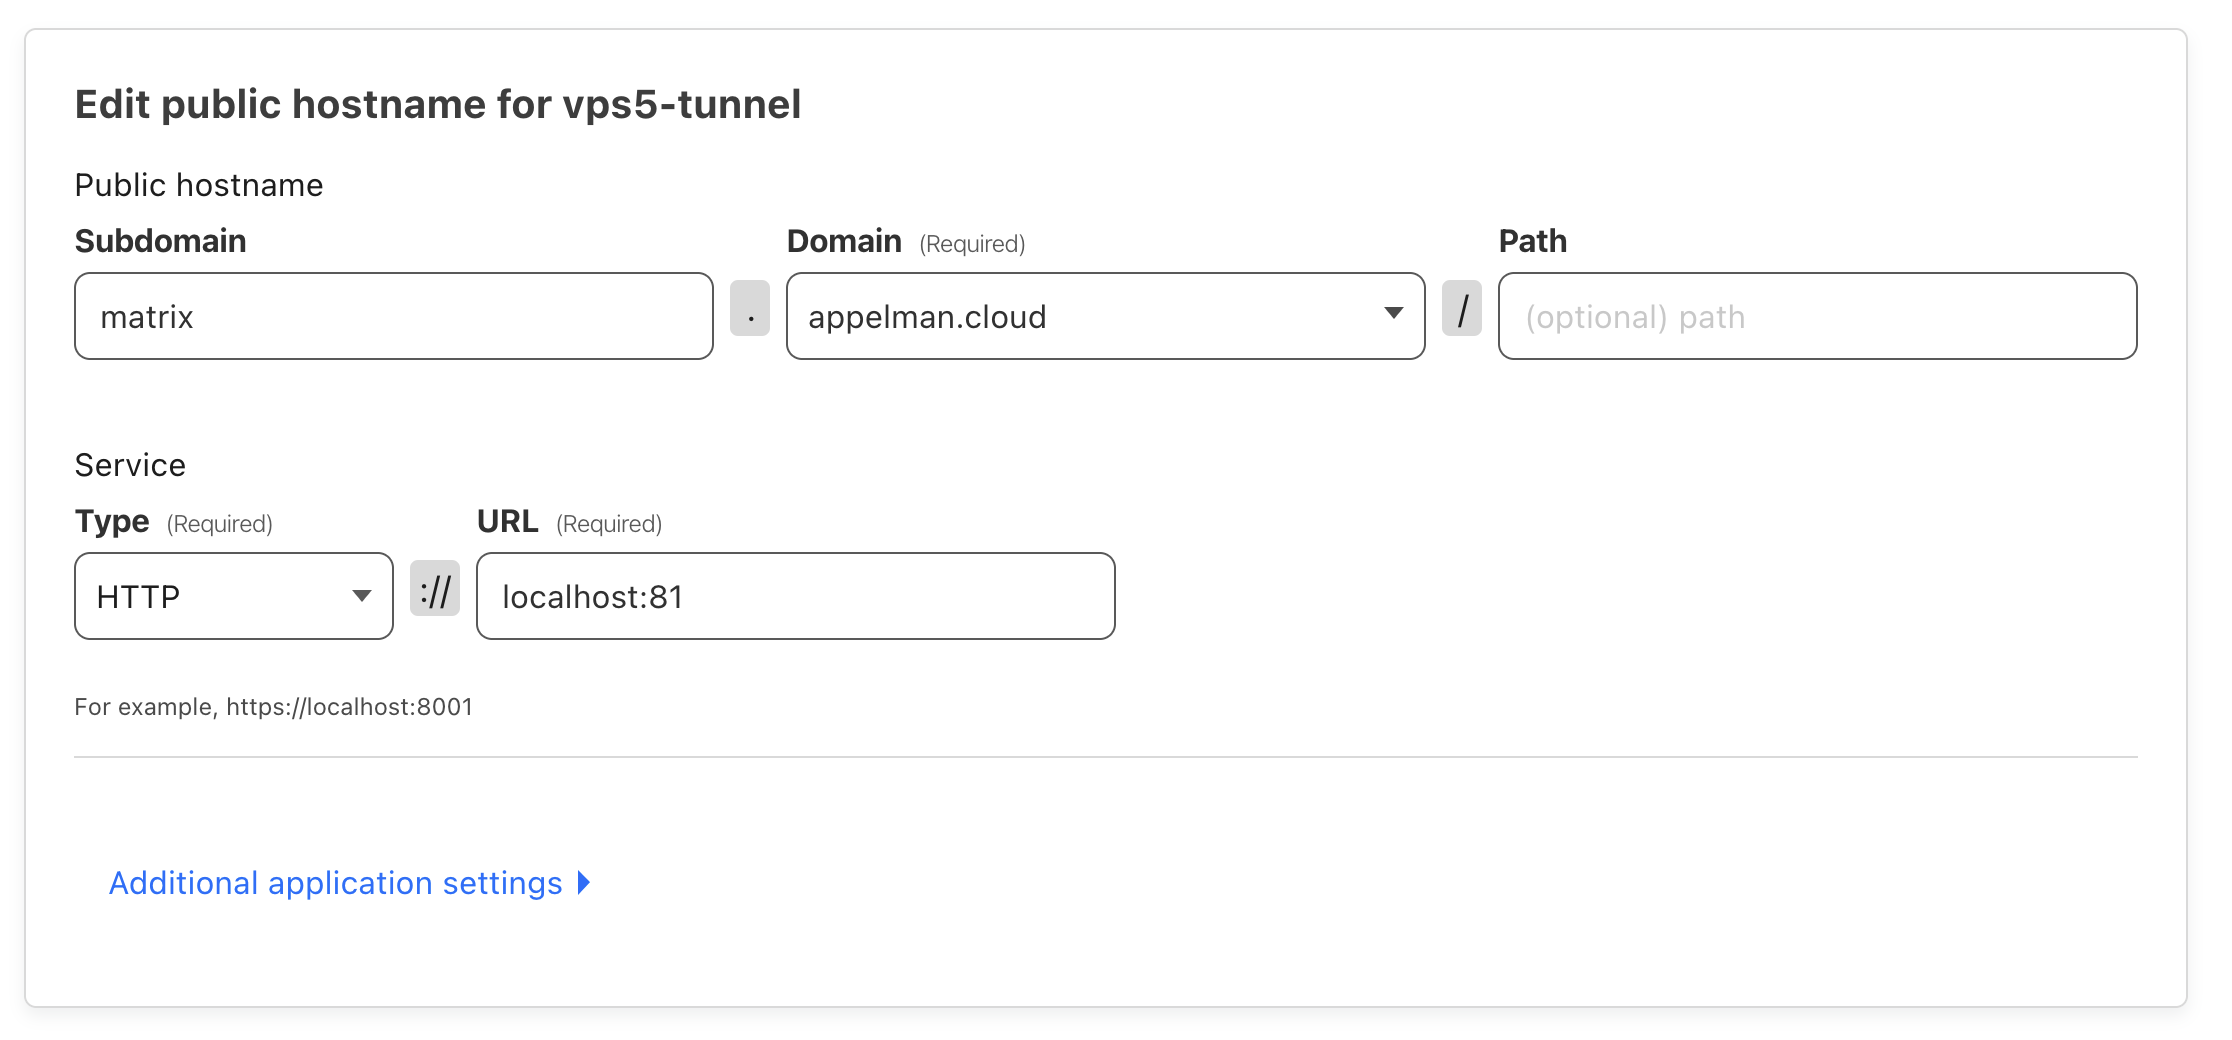
Public Hostname for Matrix where clients connect to
matrix-fed.example.compointing to port 8449 with Host header set tomatrix.example.com: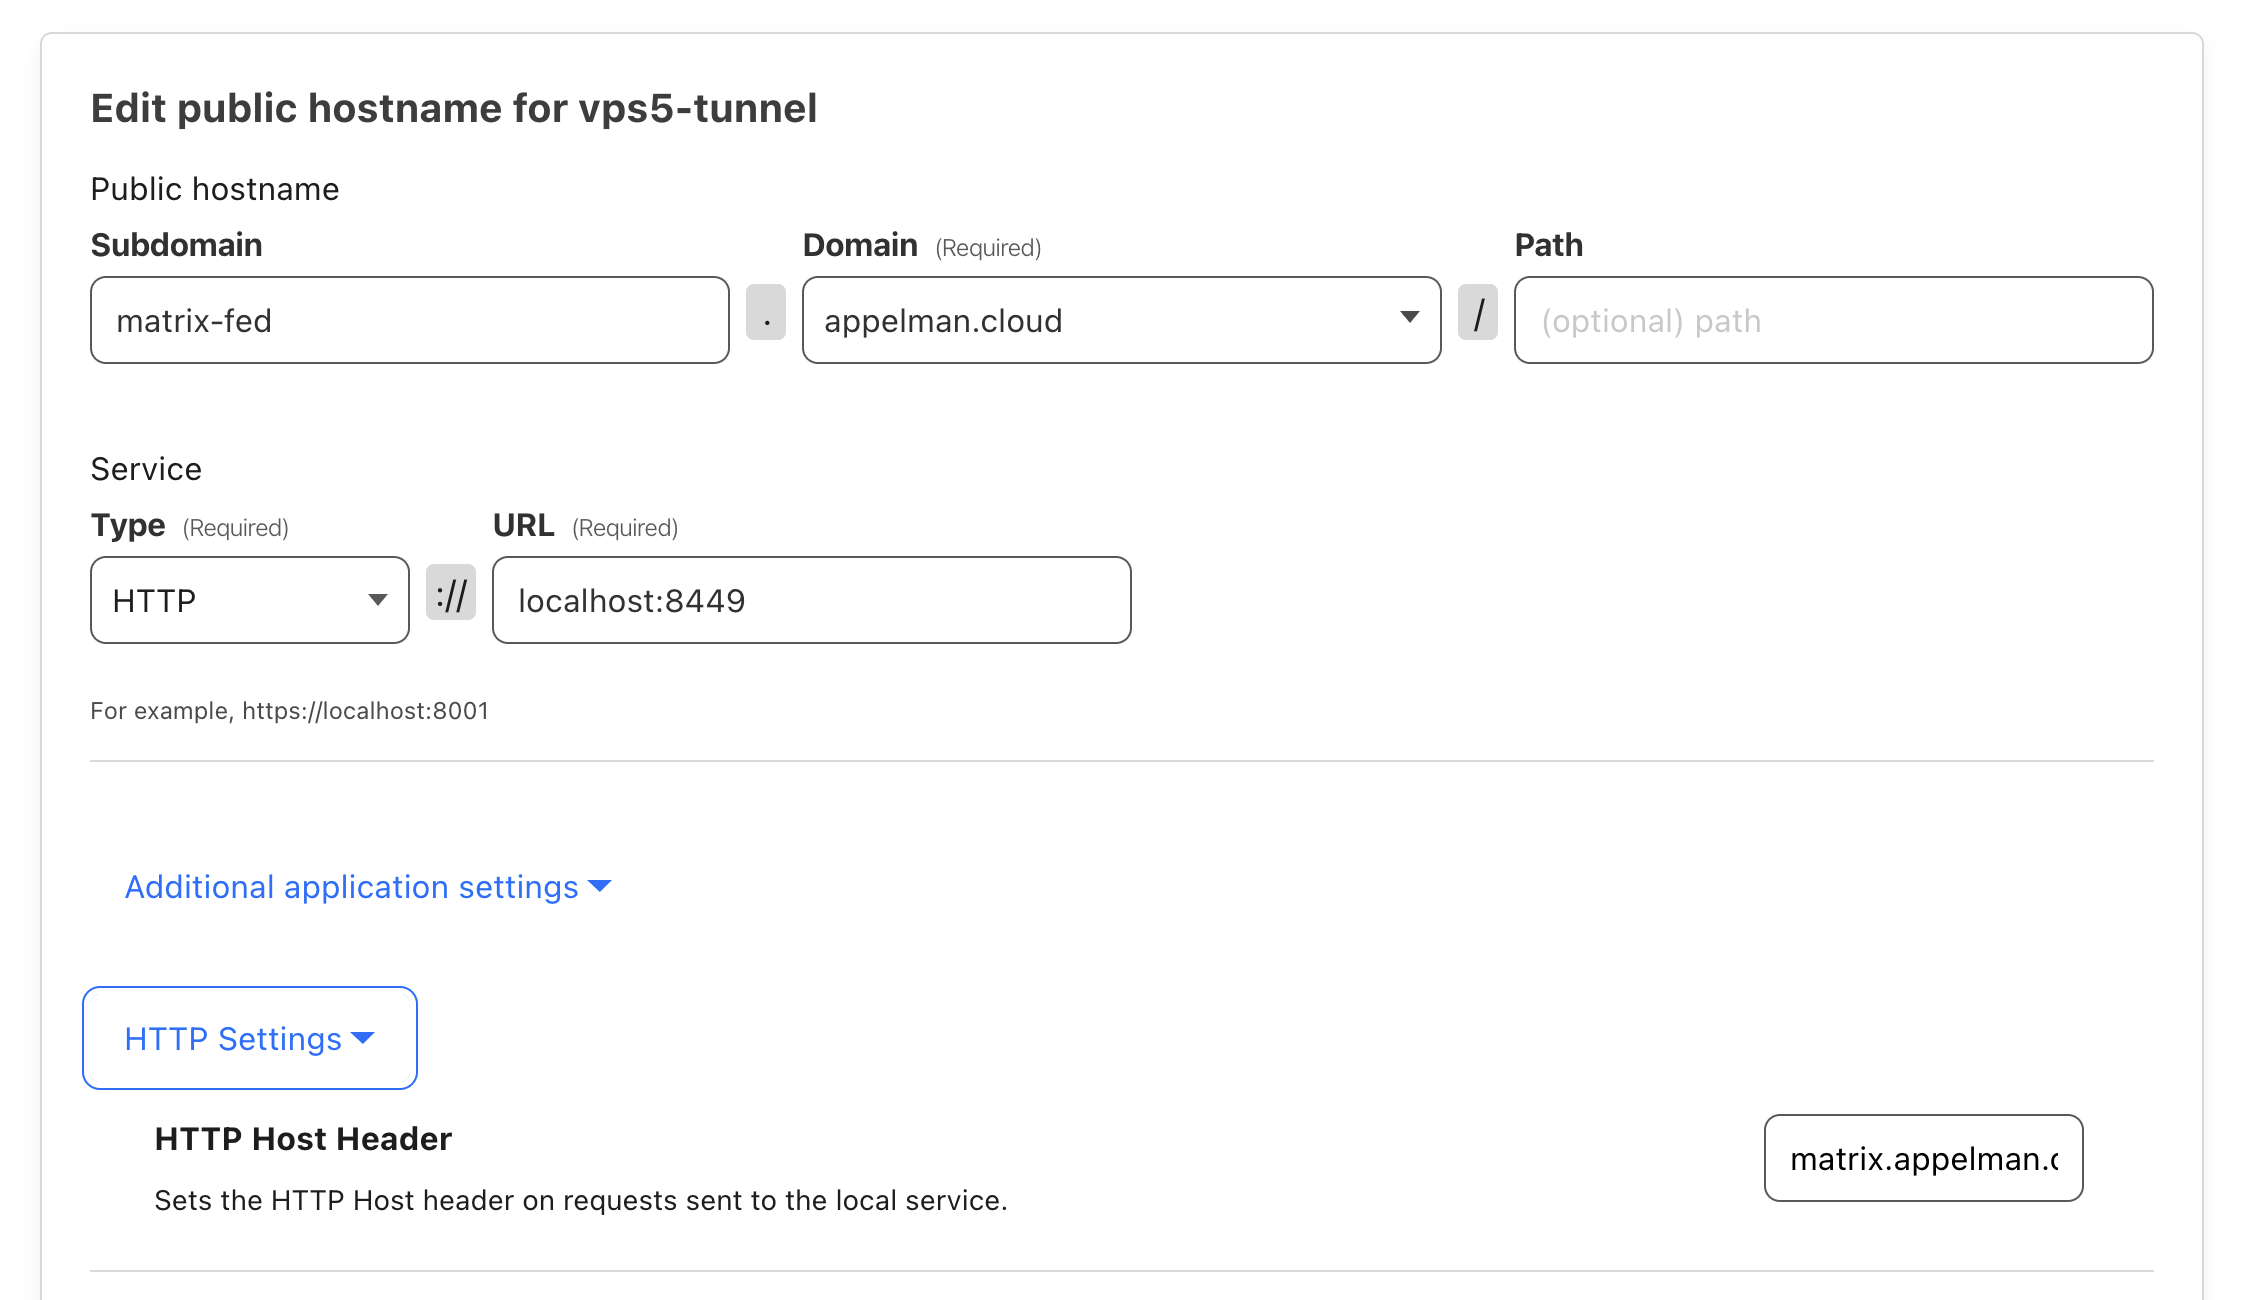
Public Hostname for Matrix where othere servers connect to for federation
Now when a server connects to the matrix-fed.example.com hostname, our Matrix server will think that everything is fine and being served a matrix.example.com, because we’ve overriden the Host header in the Cloudflare Tunnel.
Delegation and Discovery
But how will other servers know to connect to matrix-fed.example.com, and not matrix.example.com? Well, for that we’ll use the delegation and discovery mechanisms build in to the Matrix specification.
To do proper delegation, you must use the ‘well-known’ files at the root of your domain (example.com), not an SRV record. This is because we use a delegated server and the Matrix Specification says that:
DNS is insecure (not all domains have DNSSEC), so the target of the delegation must prove that it is a valid delegate for
<hostname>via TLS.
If you already have an easy way to serve files on your main domain, you need to provide the following two files:
Available under the https://example.com/.well-known/matrix/client URI:
{
  "m.homeserver": {
    "base_url": "https://matrix.example.com"
  },
  "m.identity_server": {
    "base_url": "https://vector.im"
  }
}
And vailable under the https://example.com/.well-known/matrix/server URI:
{ "m.server": "matrix-fed.example.com:8443" }
If you have nothing on your main domain, you can also create a directory structure matrix-well-known/.well-known/matrix containing these two files and uploading them to Cloudfare Pages with example.com as a custom domain.
Workers
A more advanced use case, is where you already have some application running on your main (apex) domain, and can’t easily add these static files there. If that application is being proxied through Cloudflare, you can leverage Workers with custom routes (aka triggers) to dynamically reply to these requests.
Because the simple nature of such a Worker, I created it through the dashboard and assigned the following route triggers to it:
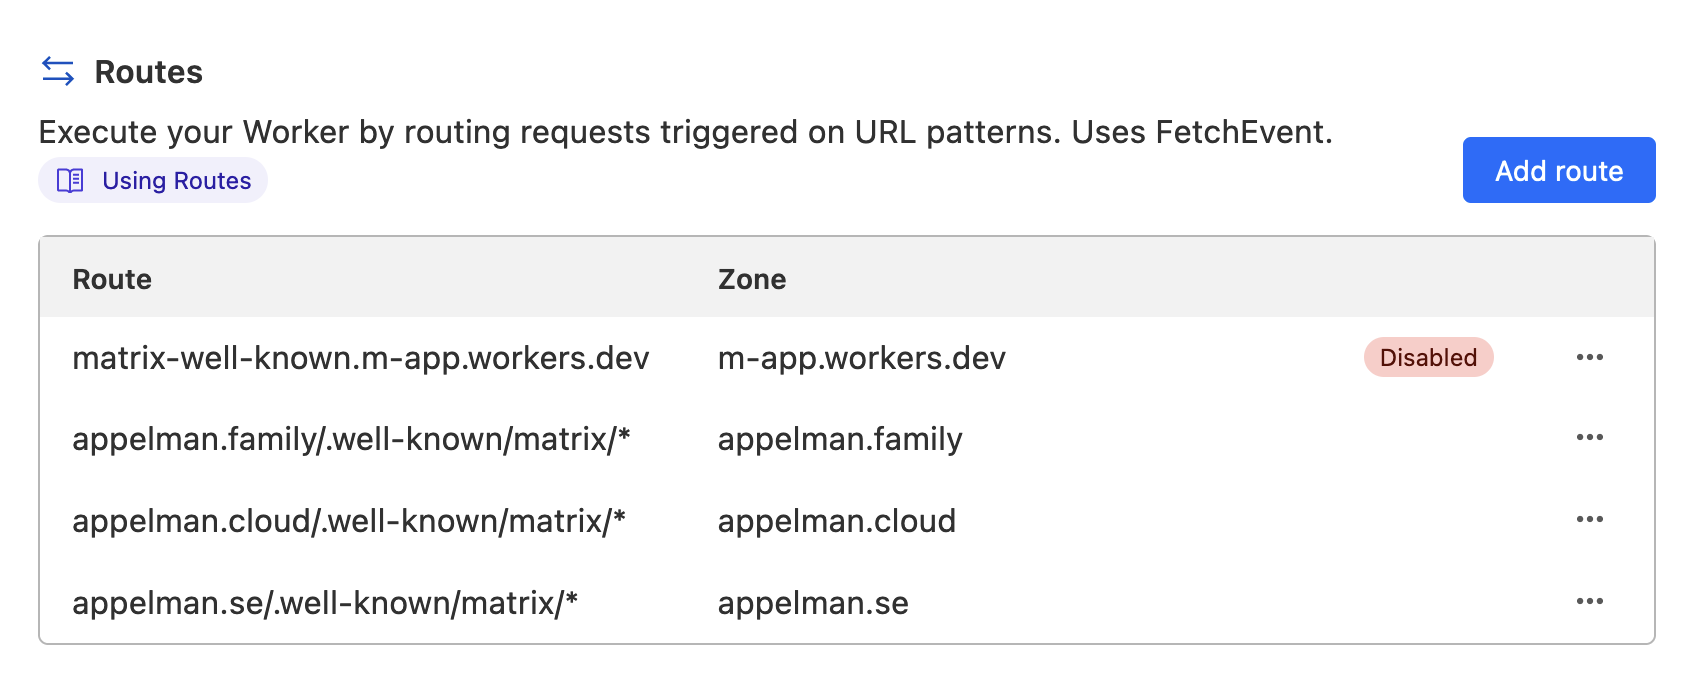
Worker Triggers, aka Routes for .well-known Matrix files
This also allows me to get the same results on all my domains, without having to manually keep them in sync.
I then used the “Quick Edit” function to compose the following quick-and-dirty script:
const HOMESERVER_URL = "https://matrix.example.com";
const IDENTITY_SERVER_URL = "https://vector.im";
const FEDERATION_SERVER = "matrix-fed.example.com:8443";

export default {
  async fetch(request, env) {
    const path = new URL(request.url).pathname;
    switch (path) {
      case "/.well-known/matrix/client":
        return new Response(
          `{"m.homeserver": {"base_url": "${HOMESERVER_URL}"},"m.identity_server": {"base_url": "${IDENTITY_SERVER_URL}"}}`
        );
      case "/.well-known/matrix/server":
        return new Response(`{"m.server": "${FEDERATION_SERVER}"}`);
      default:
        return new Response("Invalid request");
    }
  },
};
Simple enough! And it does the job without interfering with the rest of my websites.
Congratulations! You now should have a fully functional Matrix server! To celebrate, feel free to send me a message on Matrix.
Also take a look at enabling sending emails through a relay server. I used the service provided by my VPS hoster TransIP. This is especially useful to verify email addresses associated to your Matrix identity.
Finish setting up your server and make sure you update the services every once in a while according to the docs!
R2 for Media Storage
Another fun thing I tried is to use Cloudflare’s S3-compatible storage called R2 as a media store. This is very easy to setup with matrix-docker-ansible-deploy as well, by following the instructions in the docs but adapting to R2:
matrix_synapse_ext_synapse_s3_storage_provider_enabled: true
matrix_synapse_ext_synapse_s3_storage_provider_config_bucket: matrix-media
matrix_synapse_ext_synapse_s3_storage_provider_config_region_name: auto
matrix_synapse_ext_synapse_s3_storage_provider_config_endpoint_url: https://xxxxxxxxxxx.r2.cloudflarestorage.com
matrix_synapse_ext_synapse_s3_storage_provider_config_access_key_id: xxxxxxxxxxx
matrix_synapse_ext_synapse_s3_storage_provider_config_secret_access_key: xxxxxxxxxxx
Note the region is set to auto, but the other variables should be self explanatory if you follow the R2 documenation and create an Edit API token.
Webhook Notifications
If you are a paying Cloudflare customer, you’re able to configure webhook notifications in your dashboard. I desperately wanted to use this feature, so my next step was to get them delivered in my new Matrix server. For this, we’ll need to enable the ‘generic’ webhooks in the Hookshot bridge:
matrix_hookshot_enabled: true
matrix_hookshot_generic_enabled: true
For more info on setting this up, see the matrix-docker-ansible-deploy docs for hookshot.
After you rerun the deploy command (just setup-all) your Matrix server should be back up. Open your Element client, invite the bot in to a room where you want to receive the notifications, and make sure to give it Mod powers. Then send it a message containing !hookshot webhook Cloudflare to the room. If everything went well, you should now receive a private message from the Hookshot bot containing a URL that you can then use in the Cloudflare dashboard.
Deleting a Webhook
One thing I ran into was that there is no easy way to delete a webhook once created. For that you need Hookshot’s provisioning API. Opening up the host_vars YAML file again to add it:
matrix_hookshot_provisioning_enabled: true
matrix_hookshot_provisioning_port: 9002 # default port
matrix_hookshot_provisioning_secret: "XXXXXX"
matrix_hookshot_provisioning_internal: "/v1"
matrix_hookshot_provisioning_endpoint: "https://hookshot.example.com{{ matrix_hookshot_provisioning_internal }}"

matrix_hookshot_container_http_host_bind_ports:
  - "127.0.0.1:9002:9002"
Then run the setup again with just setup-all. While that runs, go to the Cloudflare Zero Trust dashboard, and add a Public Hostname to the Cloudflare Tunnel, and remember to also protect it with an Access Application.
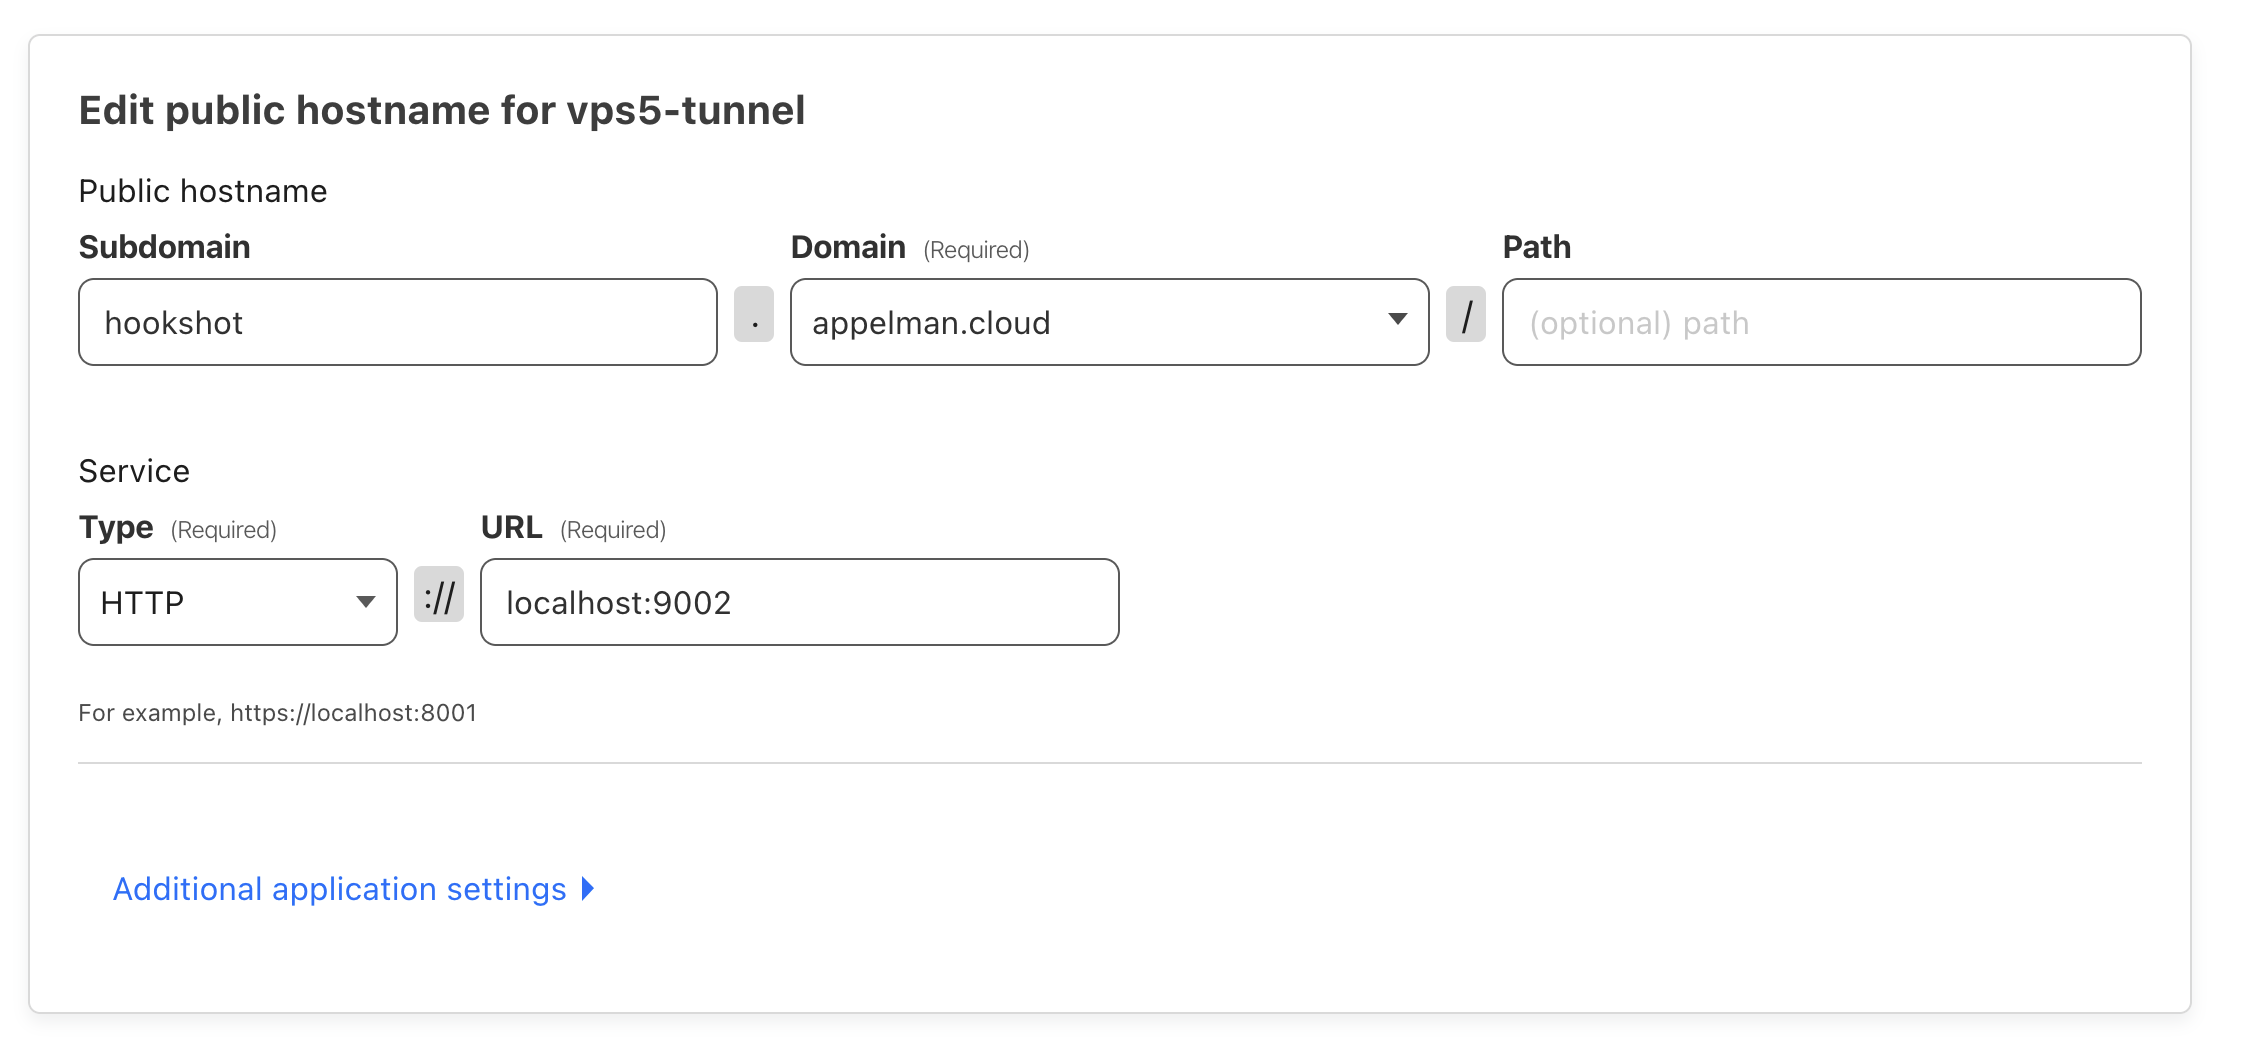
Public Hostname for the Hookshot provisioning API
When all that’s done, you’ll be able to run curl commands using cloudflared providing your Matrix user identity in the query and the provisioning secret in the Authorization header:
cloudflared access curl "https://hookshot.example.com/v1/$ROOM_ID/connections?userId=%40user%3Aexample.com" -H "Authorization: Bearer $PROV_SECRET"